The Oregon Scientific Weather Station is a comprehensive tool for monitoring weather conditions, offering precise temperature, humidity, and barometric readings. It features wireless sensors, atomic clock synchronization, and user-friendly interfaces for seamless operation.
Purpose and Scope of the Manual
This manual is designed to guide users through the setup, operation, and maintenance of the Oregon Scientific Weather Station. It provides detailed instructions for installing sensors, configuring settings, and troubleshooting common issues. The manual also covers advanced features like weather forecasting and historical data analysis. Intended for both new and experienced users, it ensures optimal performance and understanding of all functions. By following this guide, users can unlock the full potential of their weather station and enjoy accurate, reliable weather monitoring.
Key Features of the Oregon Scientific Weather Station
The Oregon Scientific Weather Station offers a range of advanced features, including wireless sensors for remote monitoring, atomic clock synchronization for precise timekeeping, and indoor/outdoor temperature and humidity tracking. It provides detailed weather forecasting, historical data storage, and multi-channel support for expanded monitoring capabilities. The station also includes a user-friendly interface, USB compatibility for data uploads, and compatibility with various sensors for comprehensive weather tracking. These features make it a versatile and reliable tool for both casual users and weather enthusiasts.

Components and Accessories
The Oregon Scientific Weather Station includes a main unit with an LCD display, wireless remote sensors for outdoor conditions, and accessories like mounting hardware and power adapters.
Packing List and Initial Inspection
Ensure the package includes the main weather station unit, remote sensor(s), mounting hardware, power adapter, batteries, and user manual. Inspect all components for damage. Verify the main unit’s LCD display is intact and functioning. Check sensors for proper connectivity and ensure all accessories are accounted for. Review the manual for setup instructions and safety precautions. If any items are missing or damaged, contact customer support immediately to resolve the issue before proceeding with installation.
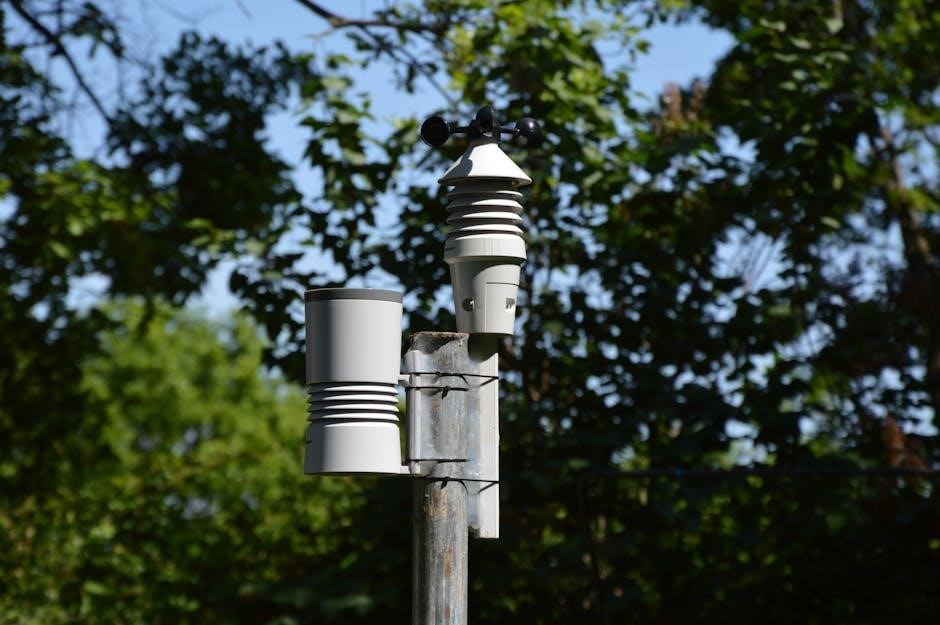
Understanding the Main Unit and Remote Sensors
The main unit of the Oregon Scientific Weather Station serves as the central hub, displaying real-time weather data and settings. It typically includes an LCD screen, control buttons, and connectivity options. Remote sensors, such as temperature, humidity, and wind sensors, transmit data wirelessly to the main unit. These sensors are designed for outdoor use, providing accurate readings from various locations. Ensure sensors are paired correctly and placed optimally to avoid interference. Refer to the manual for specific instructions on syncing and positioning for reliable performance.

Installation and Setup
Ensure proper installation by following the manual’s guidelines for mounting sensors and placing the main unit. Install batteries, pair devices, and sync sensors for accurate data collection.
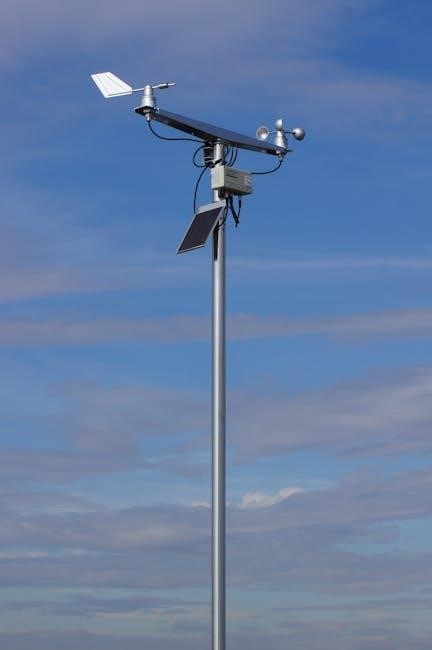
Mounting the Outdoor Sensor
Mount the outdoor sensor in an open area to ensure accurate wind speed and direction readings. Ensure the sensor is level and avoid direct sunlight. Place it at least 3 feet away from buildings or obstacles. For models like the BAR208HGX, operating at 433 MHz, secure the sensor firmly to prevent vibration. Check the manual for specific mounting hardware requirements. Ensure proper alignment of the anemometer and vane for precise wind measurements. Follow the provided instructions to synchronize the sensor with the main unit after installation.
Placing the Main Unit Indoors

Position the main unit indoors in a stable location, away from direct sunlight and heat sources to ensure accurate temperature readings. Place it on a flat surface, such as a table or shelf, and avoid areas prone to vibrations. Ensure the unit is at least 3 feet away from any walls or obstacles for proper air circulation. Check that the power source is nearby or insert batteries as specified in the manual. Ensure the main unit is synchronized with the outdoor sensor for accurate data transmission and display.

Operating the Weather Station
Navigate the interface using the buttons to access settings, view real-time data, and set alarms. Monitor temperature, humidity, and weather trends effortlessly with precise displays.
Basic Functions and Settings
Set the time, date, and unit preferences (Celsius/Fahrenheit) using the control buttons. Enable atomic clock synchronization for automatic time updates. Adjust display settings, such as brightness and unit preferences, to suit your needs. Access basic weather data, including indoor/outdoor temperature, humidity, and barometric pressure. Use the navigation buttons to scroll through historical data and weather trends. Set alarms for specific weather conditions or time reminders. Ensure proper sensor reception for accurate readings. Refer to the manual for detailed steps on configuring these settings for optimal performance.
Time and Date Configuration
Set the time and date manually or enable automatic synchronization using the atomic clock feature. Press and hold the UP button for 2 seconds to trigger a manual search for atomic clock signals. The clock will automatically update with the nearest transmitter signal. Ensure the time zone is set correctly for your location. Use the control buttons to navigate and adjust settings. The device will maintain accurate timekeeping, even when powered off. Refer to the manual for detailed instructions on configuring these settings to ensure precise time and date accuracy.
Advanced Features
The Oregon Scientific Weather Station offers advanced features like weather forecasting, historical data tracking, and atomic clock synchronization for precise timekeeping. It also supports multi-sensor connectivity.
Weather Forecasting and Historical Data
The Oregon Scientific Weather Station provides accurate 5-day weather forecasts and stores historical data for temperature, humidity, and barometric pressure. Users can view trends over days, weeks, or months, helping track seasonal changes. The device also includes alarms for extreme weather conditions, ensuring you stay informed. Historical data is stored for up to 24 months, offering long-term insights. The atomic clock ensures precise timestamping of all records, making it a reliable tool for both short-term forecasting and long-term weather analysis.

Atomic Clock and Radio-Controlled Time
The Oregon Scientific Weather Station features an atomic clock, ensuring precise timekeeping by synchronizing with radio-controlled signals. This eliminates manual adjustments, as the device automatically updates for daylight saving time and maintains accuracy. The atomic clock integrates seamlessly with weather monitoring, providing timestamped data for historical records. This feature enhances the device’s reliability and convenience, allowing users to focus on weather tracking without worrying about timekeeping. The combination of atomic accuracy and wireless connectivity makes it a robust tool for home weather enthusiasts and professionals alike.
Maintenance and Troubleshooting
Regular cleaning of sensors and replacing batteries ensures optimal performance. Refer to the manual for troubleshooting common issues like connectivity problems or inaccurate readings.
Cleaning and Battery Replacement
Regular maintenance ensures your weather station operates accurately. Clean sensors with a soft cloth to avoid dust buildup. Replace batteries in both the main unit and remote sensors every 6-12 months. Use high-quality batteries to maintain performance. Ensure proper polarity when installing new batteries to prevent damage. Refer to the user manual for specific instructions on replacing batteries in different models like BAR208HG or BAR388HG. Cleaning and timely battery replacement help extend the lifespan and reliability of your Oregon Scientific Weather Station.
Common Issues and Solutions
Troubleshooting common issues can ensure optimal performance of your Oregon Scientific Weather Station. If wireless sensors lose connection, check for signal interference or weak battery strength. Reset the device by removing and reinserting batteries. For synchronization problems, ensure the atomic clock signal is strong and the device is placed away from electromagnetic interference. If data appears inaccurate, clean sensors with a soft cloth and verify calibration settings. Refer to the user manual for detailed solutions and model-specific guidance, such as for BAR208HG or BAR388HG models.
Thank you for selecting the Oregon Scientific Weather Station. With proper installation, maintenance, and troubleshooting, it provides reliable weather monitoring and enhances your daily planning.
Final Tips for Optimal Performance

For optimal performance, regularly clean the sensors and main unit to ensure accuracy. Replace batteries as needed and avoid mixing old and new ones. Position outdoor sensors in sheltered areas to prevent extreme weather damage. Calibrate sensors periodically and update firmware if available. Refer to the manual for specific calibration steps. Secure outdoor sensors firmly to avoid displacement. By following these tips, you can maintain precise readings and extend the lifespan of your Oregon Scientific Weather Station.